Disclaimers: I am sharing what works for me. It may not work for you or it may fail over time. You may suffer data loss or worse. I disclaim all warranties and representations. I am not supporting this. I am not a Linux kernel hacker.
Update (Sept 18, 2013): In the 8th comment to this article, commentor eactor notes these months-old instructions may be getting stale. He/she says “The kernel has evolved over the past month, I successfully used your instructions to build a running linaro (Kernel 3.8) with git checkout xcomm_zynq_3_8” — but not using git checkout xcomm_zynq. So until I can revisit this article and verify this, you may wish to try git checkout xcomm_zynq_3_8 below rather than git checkout xcomm_zynq.
Why run Ubuntu Desktop on ZedBoard?
After all, isn’t Zynq for embedded systems? Most don’t need desktop UIs. Isn’t cross development faster? And if you need a UI surely Android is a better choice?
Yes, it’s not fast. But it’s fast enough. I don’t trust it. But it seems stable. Certainly it stays up all day and runs complex software builds (e.g. OpenCV).
Mostly it’s the pinch myself factor. It is remarkable that using an FPGA you can boot, have a UI, get on the internet, easily take advantage of the universe of web services and local open source software. Also by living on ZedBoard you will learn the vagaries and limitations of the platform. Eating your own dogfood.
What we’re going to build
- An XPS design for ZedBoard, including a PL bitstream system.bit for the HDMI interface, which we’ll export to the SDK.
- An FSBL (first stage boot loader) using the SDK.
- A u-boot.elf (Linux boot loader).
- A BOOT.BIN which is the catenation of the FSBL, system.bit, and u-boot.elf using the SDK.
- A Linux kernel named uImage.
- A devicetree blob named devicetree.dtb.
- A FAT32 partition on our SD card that comprises these files BOOT.BIN, uImage, and devicetree.dtb.
- An ext4 partition on our SD card with the pre-built Linaro Ubuntu userland .
- Some post-boot tweaks to the Ubuntu system.
Key URLs
Of related interest (feel free to skip this section). Just a history of things I’ve looked into.
Prerequisities
Prepare the SD card
- I recommend you set aside the SD card that came with your ZedBoard and use another one for this project.
- I’m using Sandisk 32 GB Extreme U1 45 MB/s SDHC card. Probably overkill. But some other people have reported weird I/O errors to lesser cards.
- Follow exactly the instructions on the ADI page.
“Preparing the SD Card
To boot the system on the ZED or ZC702 board you’ll need a SD memory card. The SD card should have at least 4 GB of storage and it is recommended to use a card with speed-grade 6 or higher to achieve optimal file transfer performance. … The SD card needs to be partitioned with two partitions. The first one should be about 40MB in size and the second one should take up the remaining space. For optimal performance make sure that the partitions are 4MB aligned. The first partition needs to be formatted with a FAT filesystem. It will hold the bootloader, devicetree and kernel images. The second partition needs to be formatted with a ext4 filesystem. It will store the systems root filesystem.”
- I use $ sudo gparted. Then I safe-eject the SD card and reinsert it just to be safe.
Building the programmable logic hardware
- I built this on Windows 7 x64 with ISE 14.4 and EDK.
- Aside: I am tempted to try installing Xilinx tools on Ubuntu, but they are not supported. I already run Ubuntu, so I am disinclined to also run a CentOS VM just for this purpose. I could probably “make Ubuntu work” but if I have to file a webcase I don’t want to hear “oh you’re hosting on an unsupported OS.” It is lamentable that despite Ubuntu’s popularity and Long Term Support options, Xilinx does not support it. It is also lamentable that Xilinx tools do not yet support Windows 8. Windows Build Conference 2011 was 18 months ago. Windows 8 betas have been available since then. Windows 8 shipped 6+ months ago and there are more than 100 million Windows 8 seats out there. For some reason Xilinx is always slow to track Windows releases. It’s almost as if each release they want to “wait and see if this new Windows thing will catch on”.
- Download and build the reference design for ZedBoard. From http://wiki.analog.com/resources/fpga/xilinx/kc705/adv7511 download http://wiki.analog.com/_media/resources/fpga/xilinx/kc705/cf_adv7511_zed_edk_14_4_2013_02_05.tar.gz
- Unpack it $ tar xzvf …
- Double click the system.xmp file in cf_adv7511_zed. This launches Xilinx Platform Studio.
- Click Generate BitStream and grab a coffee head out for lunch work-ahead on the u-boot and linux kernel steps below, while you check back on progress on this step. Marvel at all the warnings. Wonder how an FPGA designer ever separates important warnings from ignored warnings. Lament how long it takes core generation and synthesis to get to MAP/PAR of the design!
- Click Export Design. Select Export and Launch SDK. (Continued below.)
Build u-boot, the Linux boot-loader
- Read http://www.wiki.xilinx.com/U-boot
- Read http://www.wiki.xilinx.com/Build+U-Boot
- Read http://www.wiki.xilinx.com/Fetch+Sources
- Read http://www.wiki.xilinx.com/Install+Xilinx+Tools
- Install x86 based ARM cross compile tools somewhere. I have /home/jan/CodeSourcery/Sourcery_CodeBench_Lite_for_Xilinx_GNU_Linux installed and at the front of my $PATH. I don’t remember where it came from and Xilinx has changed their wiki so it doesn’t refer to it, rather to Xilinx’s own cross-compiler tools. It may be if you have Linux based ISE 14.4 with EDK you already have them installed.
- Fetch the source: $ git clone git://git.xilinx.com/u-boot-xlnx.git; cd u-boot-xlnx
- Git-checkout the 14.4 version branch. Adapteva did this to preclude subsequent trunk checkins breaking things. Good idea. $ git checkout -b xilinx-v14.4 xilinx-v14.4
- Set up cross-compile prefix: $ export CROSS_COMPILE=arm-xilinx-linux-gnueabi- (and ensure your ARM tools are on your PATH).
- Edit include/configs/zynq_common.h to tweak the u-boot boot script so that it doesn’t try to load a ramdisk image from SD and doesn’t try to pass it to “bootm”:
+              "sdboot=echo Copying Linux from SD to RAM...;"
+                              "mmcinfo;"
+                              "fatload mmc 0 0x3000000 ${kernel_image};"
+                              "fatload mmc 0 0x2A00000 ${devicetree_image};"
+                              "bootm 0x3000000 - 0x2A00000"
- U-boot will therefore launch the kernel with bootm 0x3000000 – 0x2A00000 The all-important ‘–‘ tells u-boot (and the kernel) there is no ramdisk filesystem (so don’t load one!) Instead it will use the bootargs from the devicetree.dtb and will use the Linaro ext4 filesystem /dev/mmcblk0p2 from the SD card, as desired. (See below.)
- Configure: $ make zynq_zed_config
- Build: $ make
- The output file u-boot should be copied to your cf_adv7511_zed’s SDK project workspace directory, renamed u-boot.elf.
Build the boot image BOOT.BIN
- This consists of the FSBL (first stage boot loader), the system.bit configuration bitstream, and the U-boot Linux boot-loader u-boot.elf. Follow exactly the instructions on the first ADI page:
“Build the boot image
To complete this step you need to have a u-boot image for the Zynq platform. Please refer to the Xilinx wiki on how to build such an image. [[Rather — see above instructions.]]
The bootloader can be build with Xilinx SDK. In order to do so it is necessary to first export the HDL design from the Xilinx Platform Studio to the SDK, this is done by clicking the “Export to SDK” button in the Platform Studio GUI.
Export project to SDK: …
Once the project has been exported create a new FSBL project in the SDK. To do this right-click on the newly exported hardware platform specification in left “Project Explorer” panel and select “New > Project” from the popup menu. Select “Xilinx – Application Project” on first dialog page. On the second dialog page choose a name for the project (zynq_fsbl for example) and on the third page select “Zynq FSBL” template.
The project should build automatically. If not a manual build can be started by right clicking the newly created project in the left “Project Explorer” pane and selecting “Build Project” from the popup menu. After the project has been build it is time to generate the boot image. This is done by right clicking on the project in the left “Project Explorer” pane and selecting “Create Boot Image”. This will open up the bootgen wizard. The bootgen wizard needs three files:
The freshly build zynq_fsbl.elf binary
The system.bit bitstream
The u-boot.elf binary
Add these files to partitions list in the dialog, then select an output folder.
Clicking “Create Image” will now generate in the chosen location a new boot image for the target platform. The output *.bin file should be renamed “BOOT.BIN” and needs to be saved on the first partition of the SD-card .” [[e.g. the BOOT partition mounted at /media/BOOT]]
Build the linux kernel, mostly according to the ADI instructions.
- Fetch it. $ git clone https://github.com/analogdevicesinc/linux.git ; cd linux # and get another coffee.
- Checkout a specific branch. $ git checkout xcomm_zynq
- (Note: see Update at top of article. You may wish to use $ git checkout xcomm_zynq_3_8 instead.)
- $ export ARCH=arm
- $ export CROSS_COMPILE=arm-xilinx-linux-gnueabi-
- Configure it. $ make zync_xcomm_adv7511_defconfig # yes, ‘zync’ with a ‘c’
- To build the kernel uImage (e.g. a u-boot-image-prefixed kernel), the path to the (just built) U-boot tool ‘mkimage’ must be added to the $PATH variable, so that the kernel compilation process can find it.: $ export PATH=/……../u-boot-xlnx/tools:$PATH
- Build it. $ make uImage LOADADDR=0x00008000
- Copy it to your BOOT partition on your SD card. $ cp arch/arm/boot/uImage /media/BOOT
Build the device tree
- Note your DTS file arch/arm/boot/dts/zynq-zed-adv7511.dts includes arch/arm/boot/dts/zynq-zed.dtsi with these bootargs:
// bootargs = "console=ttyPS0,115200 root=/dev/ram rw initrd=0x1100000,33M ip=:::::eth0:dhcp earlyprintk";
bootargs = "console=ttyPS0,115200 root=/dev/mmcblk0p2 rw earlyprintk rootfstype=ext4 rootwait devtmpfs.mount=0";
- That’s good — Linux will mount your root file system from the second partition on your SD card.
- Make the device tree .DTS file for the ZedBoard with ADV7511 support. $ make zynq-zed-adv7511.dtb
- Copy it to the SD card as devicetree.dtb: $ cp arch/arm/boot/zynq-zed-adv7511.dtb /media/BOOT/devicetree.dtb
Install the root file system
- We’ll basically follow the ADI instructions to fetch the Linaro Ubuntu root filesystem and install it on the ‘rootfs’ partition on your SD card. The only change is we will pick up a five months’ newer and fresher build of Ubuntu Precise. This helps minimize the number of post-boot package updates.
- Download Linaro Ubtunu ARM rootfs archive:
$ wget https://releases.linaro.org/12.11/ubuntu/precise-images/ubuntu-desktop/linaro-precise-ubuntu-desktop-20121124-560.tar.gz
- Extract the root filesystem onto the SD card. $ sudo tar –strip-components=3 -C /media/rootfs -xzpf linaro-precise-ubuntu-desktop-20121124-560.tar.gz binary/boot/filesystem.dir
- At this point you should be all set. Your /media/BOOT partition contains BOOT.BIN, uImage, and devicetree.dtb. (Recall BOOT.BIN itself contains the FSBL, the system.bit config bistream, and u-boot.elf.) Your /media/rootfs contains a recent Linaro Ubuntu root filesystem.
- Safe-eject the SD card. Install it in Zynq SD slot. Follow the rest of the ADI instructions:
Testing the system
“Once all of the previous tasks have been completed it is time to test the system. To do this inserted the SD-card into the board and power-up the board. After a few seconds the blue “DONE” LED should light up. This means that the bitstream has been successfully loaded and the system will now start to boot. It is also possible to connect to the serial console by using the on-board UART-to-USB bridge, this allows to monitor the boot process and view debug messages.
After another few seconds the monitor connected to the system will turn on and display the Linux mascot in the top left corner, after that the Ubuntu Desktop system will appear on the screen. The system is now ready to be used.”
- I would wait an additional 30 seconds until booting finishes including checking packages.
- You can also add a USB keyboard/mouse to use the desktop on the HDMI monitor.
- I like to shut the system down cleanly: $ poweroff
Some post-boot tweaks to the Zynq Ubuntu system:
- Follow the ADI instructions “Enable xf86-video-modesetting Xorg driver”
- Install the VNC and RDP servers. From serial port console or Terminal, $ sudo apt-get install xrdp . Then you will be able to boot and run headless. (You will still need to use the serial port console to interrogate the DHCP-assigned IP address ($ ifconfig) in order to connect via VNC or RDP to the ZedBoard).)
- Add yourself as a user instead of using the linaro account. Unfortunately, using the desktop System Settings >> User Accounts always crashes on me. Instead I open a Terminal and use useradd.
Adding some “swap space”
- The board “only” has 512 MB of DRAM and this can be a bit tight. For more headroom I always add a 1 GB rootfs swap file. Note: this may be a very bad idea in the long term! (I don’t think there is wear-leveling in the SD card interface.)
- $ sudo bash
- $ mkdir /var/cache/swap
- $ dd if=/dev/zero of=/var/cache/swap/swapfile bs=1M count=1024
- $ echo “/var/cache/swap/swapfile none swap sw 0 0” >> /etc/fstab
- ^D
- Reboot.
- Verify it’s working: $ swapon –s
Running headless — maximizing your available programmable logic
- Here are the steps I took to build a new design with empty PL, and boot to desktop Ubuntu via RDP (Windows Terminal server, mstsc.exe) or VNC.
- First build a new device tree source file. Copy the original device tree (arch/arm/boot/dts/zynq-zed-adv7511.dts) elsewhere and edit that to delete all the entries which pertain to PL-based control/status registers. Add it to arch/arm/boot/dts/Makefile. (TODO: provide an example DTS file.)
- Rebuild it: $ make zynq-zed-no-pl.dtb; cp arch/arm/boot/zynq-zed-no-pl.dtb /media/BOOT/devicetree.dtb
- Boot your ZedBoard. Notice your HDMI monitor is blank!
- On your TeraTerm serial port console, get the DHCP IP address ($ ifconfig), and connect and login to your ZedBoard via RDP or VNC from your PC
- Notice desktop Ubuntu works fine headless, even though you’re currently not using any of the configured I/O device cores (e.g. HDMI, audio, DMA) in the PL fabric.
- (Caution: I last did this months ago, this description is from memory, I haven’t bothered to repeat it for this blog:)
Now build an empty PL design. Go into XPS. copy your original ADI reference design elsewhere, then modify it to delete all PL-based cores without disturbing any settings/configurations in the PS configuration area. (The PS7 subsystem remains configured with DRAM, serial, USB, Ethernet MAC, etc.). Create a new Avnet ZedBoard XPS project with Base System Builder. Remove all the LEDs and switch peripherals you are offered. Don’t add any PL peripherals. Build. Export to SDK. Run SDK, build FSBL, then build a new u-boot.bin a.k.a. BOOT.BIN, with the new FSBL, this (empty PL fabric) system.bit, and your u-boot.elf.
- Copy that to your SD card $ cp u-boot.bin /media/BOOT/BOOT.BIN. Reboot.
- On your TeraTerm serial port console, get the IP address ($ ifconfig), and connect and login to your ZedBoard via RDP or VNC. All should work as before, even though you are not using any of the programmable logic fabric.
Next steps
- In a later blog post, we’ll try this: Use XPS to build a design with some simple AXI pcores in the PL, export to SDK, build new FSBL, new BOOT.BIN. Copy to BOOT partition. Note the 32-bit address(es) of the memory-mapped control/status registers (CSRs) of the cores. Boot Ubuntu. Then directly read and write the core’s CSRs by opening /dev/mem (as root!) and using mmap to map the physical device address or region into the user processor. This is a hack, however.
- Then we’ll see how we can configure and use UIO (user-mode I/O) to access these same CSRs in a cleaner way.
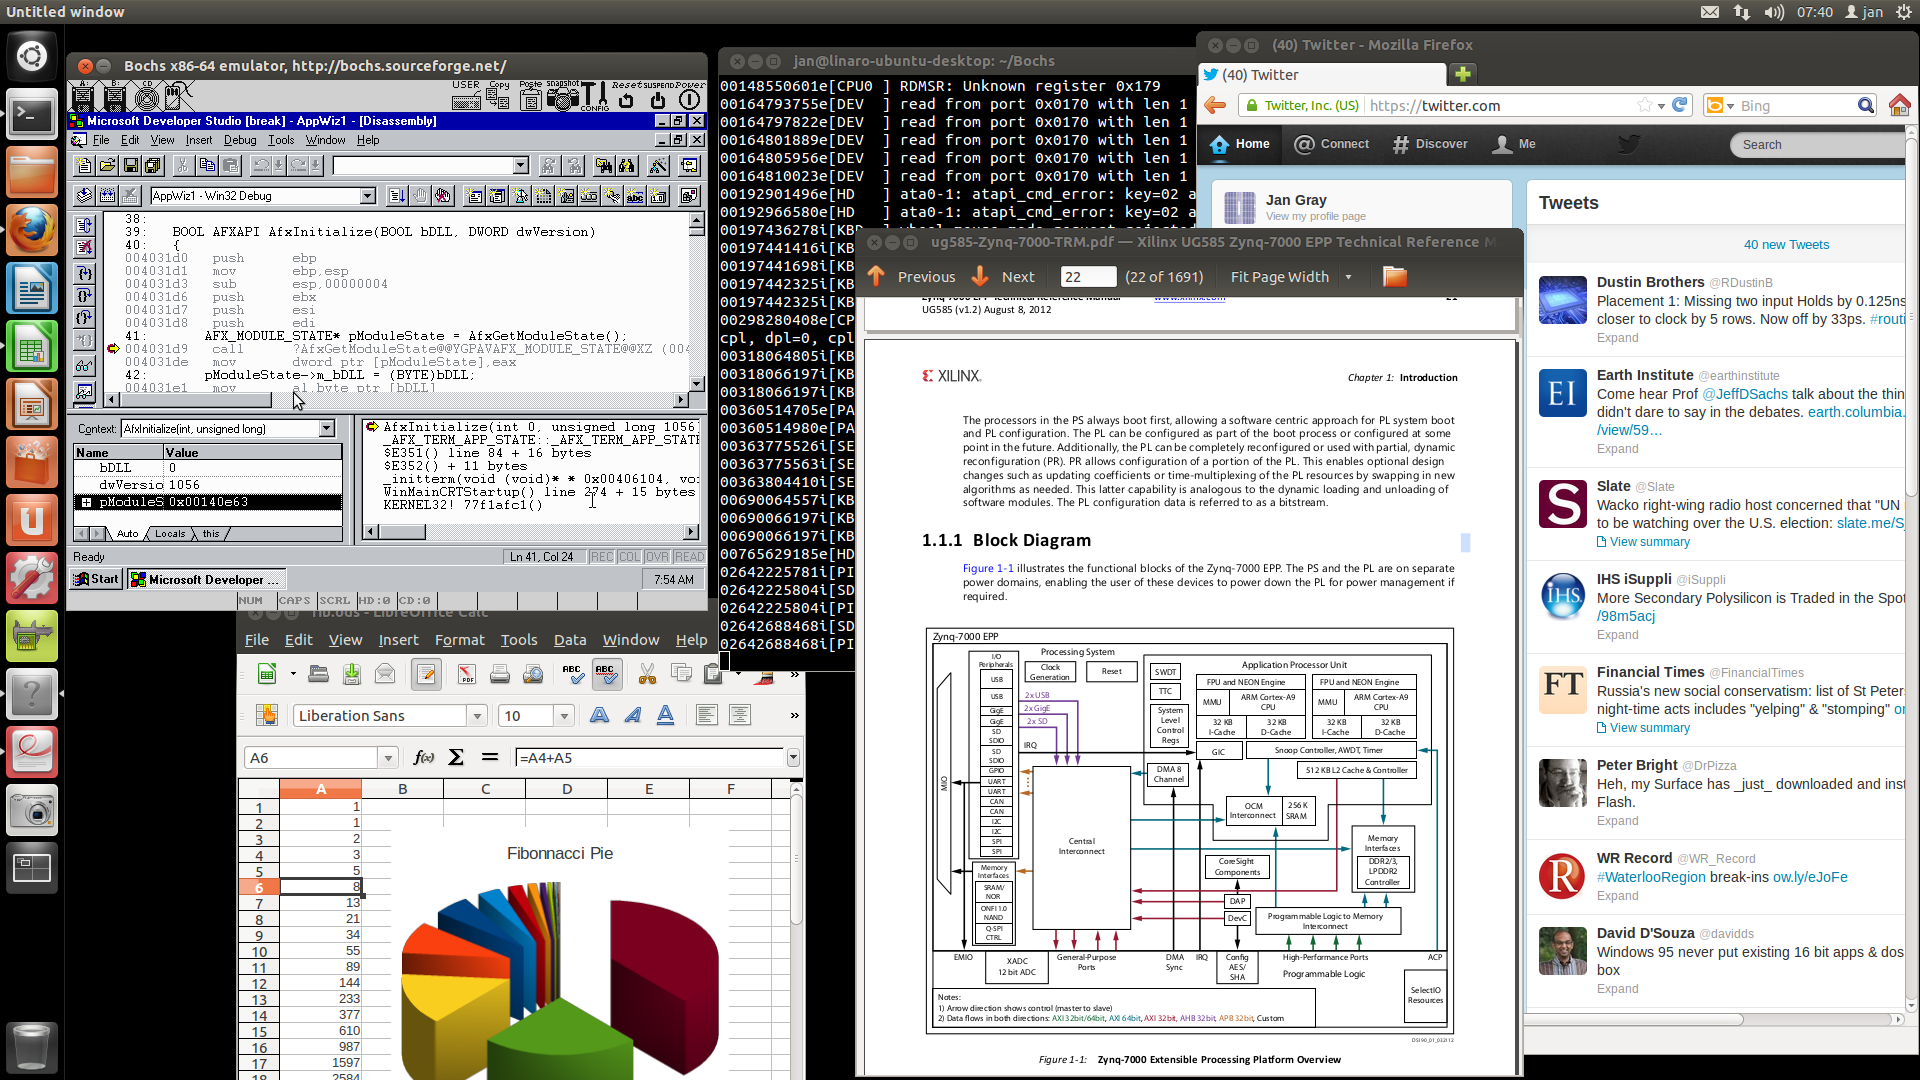
Visual C++ on Windows NT on Bochs on Linaro Ubuntu Linux on Xilinx Zynq on ZedBoard